The project
The series follows one person wiring an entire car, alone, with an Elite 2500 and Premium Universal Wire-in Harness, an iC-7 dash, a wideband controller, drive by wire and a rear-mounted fuel system. It was filmed in 2020 while Australia was in lockdown, which is why Dave does everything himself. That turns out to be the value: you see every decision a single installer makes, in order, instead of a finished harness appearing between cuts.
Episode by episode
| Episode | Focus | What to watch for |
|---|---|---|
| 1 | Introduction, tools, separating the harness into wire groups | How much time goes into prep before anything is cut |
| 2 | Printing the input/output report from ESP and assigning every wire a job | Deciding functions on paper first, then grouping wires by function and by where they go in the car |
| 3 | Sorting the integrated fuse and relay box | Adding extra fuses and relays for a thermofan mounted in the trunk |
| 4 | Adding a CAN loom, extending wires to the rear, braiding | Splicing long runs for the fuel pump, transmission fan and power steering |
| 5 | Drilling the firewall and trial fitting | Laying out the engine wiring in the car before committing to lengths |
| 6 | Final grouping, cutting, braiding and terminating | Building an injector loom for each bank |
| 7 | Engine bay install | Injectors, coils, cam, crank, flex, knock, fan, air temp, fuel pressure, DBW, alternator and battery; pull-to-seat vs push-to-seat connectors; where to mount the wideband box |
| 8 | Cabin wiring | DBW pedal, ignition switch, bump and creep buttons, finishing the coil loom, tucking the factory lighting loom away |
| 9 | Finishing and first key turn | Using a power probe, fitting the iC-7 in a custom cluster, rear-mounted pumps and fan, then the moment of truth |
Lessons we take from it
Plan every wire before you cut one
Episode 2 is the one we point customers to. The I/O report from the software becomes a map of the whole car. Once each wire has a job and a destination, the rest of the build is just following the plan. Skip this and you'll be re-pinning connectors after the loom is braided.
Trial fit, then build
The harness goes into the car, gets laid out, measured and marked, and then comes back out to be finished on the bench. Measure twice, cut once is a cliché because it saves harnesses. Branch lengths that look fine on a bench rarely match the engine bay.
Power distribution is part of the design
High-current loads like fans and pumps need relays and fuses sized for them, not just an ECU output. If that part feels unclear, read how relays work and why you need one. Parts like the 6-circuit Haltech fuse box keep it tidy, and a PDM can replace the relays altogether on newer builds.
Good terminations are everything
A harness is only as reliable as its worst crimp. The right tool for each terminal family, like the dual crimper set, matters more than any fancy sleeving. Our crimping tech tip covers technique.
Grounds and CAN deserve the same care
Adding a CAN loom early (episode 4) makes it easy to hang a dash, wideband and keypad off the harness later. And none of it works properly without a solid ground plan; see ECU grounding dos and don'ts.
Tools and parts in the build
- Elite 2500 with the Premium Universal harness and its integrated fuse and relay box
- Haltech dual crimper set, plus plugs, pins and wire
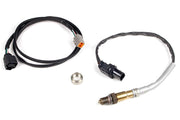
- A CAN wideband controller, such as the WB1 kit
- iC-7 dash in a custom cluster (our guide to installing an iC-7 covers the basics)
- A power probe for testing circuits, braiding, harness tape and butt splices
FAQ
Is a universal harness a good first wiring project?
It can be, if you plan it like Dave does. If you'd rather skip the loom building, a terminated harness or plug-in ECU gets you running faster. Book a free 30-minute consultation and we'll help you pick.
Can we build or finish a harness for you?
Yes. Contact us with your engine, ECU and wish list.