What this ECU is, in plain terms
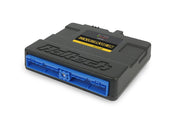
The Nexus Plug-in ECU for the Skyline R32/R33/R34 GT-R is a full Nexus standalone ECU packaged to mate with the factory Nissan connector. You unplug the original computer, plug this one in, and the car's existing engine loom does the rest. There's no splicing and no new harness to build, which is why it's our go-to recommendation for RB owners who want proper engine management without turning the car into a wiring project.
Because it is a Nexus unit, it's programmed in NSP, the same software used across the rest of the Nexus range. That means one program covers the engine tune, extra functions and any Haltech CAN devices you add later.
Which Skylines it fits
| Chassis | Model | Engine |
|---|---|---|
| R32 | GTS-T | RB20DET |
| R32 | GT-R | RB26DETT |
| R33 | GTS-T | RB25DET |
| R33 | GT-R | RB26DETT |
| R34 | GT-R | RB26DETT |
Two limits to know up front: it supports manual transmission cars only, and the R34 GT-R factory immobilizer is not supported. If your R34 still relies on the immobilizer, plan to deal with that before install day. If you have an R34 GT-T or a Stagea, this isn't the right unit; ask us and we'll point you to the correct option.
What comes in the box
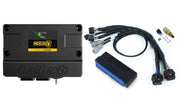
- The Nexus ECU itself (76 positions, 6-cylinder)
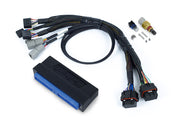
- An expansion harness, 2.5 m (8 ft), carrying an air temperature plug and a wideband O2 plug
- A Haltech air temperature sensor (1/8 NPT) plus an aluminum weld-on bung to mount it
- Mounting brackets with their hardware
- 2.5 m of vacuum hose and a T-piece
- A USB-C cable and a quick start guide
Before it goes in the car: NSP and the setup wizard
Install NSP on a Windows laptop first. It is a free download from Haltech, and our downloads page collects the matching guides and diagrams. Once it's installed, plug the USB-C cable into the port on the front of the ECU. NSP will detect the unit and wake it in a low power mode. In that state the inputs and outputs stay switched off, so you can build or load a map on the bench with zero risk of firing an injector or coil.
That's where the setup wizard comes in. It walks you through the build in a logical order:
- Name the vehicle. NSP creates a folder for it on your laptop, which is where maps and logs will be saved. Add a short description too; it makes it much easier to tell tune versions apart later.
- Pick the car and engine from the list of 1989 to 2002 Skylines.
- Choose your auxiliary harness, so the ECU can allocate the correct inputs for the wideband, pressure sensors and anything else on it.
- Answer the application questions: cable or electronic throttle, cam profile, injector and ignition details.
- Review the summary and change anything that doesn't match your build before you finish.
The result is a base tune that should start and idle the engine. It is not a finished calibration. Load the wizard output or a known-good map before the ECU ever sees vehicle power, and budget for real tuning afterward. We're happy to handle that part; book a free 30-minute consultation to talk it through.
Connecting by Wi-Fi or phone
USB is the default, but the ECU also has a built-in Wi-Fi module with an internal antenna. Turn it on under Connections in NSP while connected by USB, then open the Wi-Fi item to choose an SSID (at least 1 character) and a password (at least 8), and click Apply. With the ignition on, join that network from your laptop's network settings. A few practical notes:
- Wi-Fi only works when the ECU is on main (ignition) power, not USB power alone.
- Two laptops can be on Wi-Fi at the same time, plus one on USB-C.
- When you disable the module, it's fully off rather than sleeping.
The free Haltech Connect app for Android and iOS uses the same wireless link. It's handy in the garage for live data, simple gauges, clearing trouble codes, assigning wiring and tweaking a few parameters without opening the laptop. More detail is in our Wi-Fi article.
Install checklist: the things that trip people up
| Item | What's different | Our advice |
|---|---|---|
| Load sensing | The factory air flow meters are not used. The ECU reads load from its onboard 4 bar MAP sensor. | Tee the supplied hose into the fuel pressure regulator's vacuum line and run it to the ECU. Keep it short, sealed and away from heat. |
| Air temperature | GT-Rs can keep the factory IAT sensor or use the kit sensor. GTS-Ts must use the kit sensor. | On GTS-Ts the stock sensor lives in the AFM, which is coming out. Weld the bung into the intake pipe after the intercooler. |
| Throttle position | TPS must be calibrated in NSP. | Do it before the first crank, with the pedal fully released and then fully pressed. |
| Base timing | Timing must be confirmed with a light once it idles. | Lock timing in NSP, check it with a timing light, then adjust the offset until they agree. |
| Immobilizer | Not supported on the R34 GT-R. | Sort this out before install day. |
Pinout and I/O
You mostly won't need to think about pins, because the wizard assigns them for you. It can even swap functions internally to match the engine (for example, injector outputs 4 and 6 on an RB20), so nothing has to be moved in the plug. A few points worth knowing:
- The functions NSP assigns may not match a generic pin table. The I/O Report in NSP is the source of truth for your map.
- DPO 9 to 21 have fixed jobs and can't be reassigned.
- Pin drawings show the ECU's pin side, not the harness side.
Need the pinout diagram? Ask us and we'll send it over with advice for your build.
The 26-pin auxiliary connector and expansion harnesses
Alongside the factory plug, the ECU has a 26-pin auxiliary connector for anything the car never had from Nissan. The included expansion harness plugs into it and is long enough to pass through the firewall. It gives you an air temperature connector, a wideband plug driven by the ECU's onboard wideband controller, and spare pins for extras like fuel pressure, oil pressure, flex fuel or a drive-by-wire conversion.
If you'd rather not pin those extras yourself, two optional harnesses do it for you:
- IO Expansion Harness (HT-189002): ready-made plugs for a wideband, flex fuel sensor, oil pressure, fuel pressure and air temperature, plus spare pins for the connector's extra outputs.
- DBW Expansion Harness (HT-189003): everything the IO harness has, plus a Bosch DBW throttle plug and a universal accelerator pedal connector you can wire to the pedal of your choice.
The switched 12V pins across the CAN and auxiliary connectors share 8 A in total between all three. Add up everything you're powering from them, and use a relay for anything hungry.
Mounting it in the factory location
The factory Skyline ECU lives behind the passenger-side kick panel. Pull the kick panel cover, undo the factory connector with a 10 mm wrench or socket, and swap the units. The Nexus is sized so the cover still goes back on.
Each chassis uses its own pair of the supplied brackets, and the R32, R33 and R34 combinations are different. Test-fit before you tighten anything, and re-torque the connector bolt with the same 10 mm tool so the plug is fully seated.
Adding Haltech CAN devices
A dedicated CAN connector on the ECU lets you add Haltech devices without touching the factory loom. Link several with Haltech CAN cables and a CAN hub. Popular additions are the uC-10 dash for a configurable screen, a CAN keypad for paging screens or switching functions, and a Nexus IO16 when you run out of inputs and outputs.
FAQ
Do I need to rewire my Skyline to fit this ECU?
No. It plugs into the factory connector. The only additions are the vacuum line to the onboard MAP sensor and, on GTS-Ts, the included air temperature sensor.
Will it run my car straight out of the box?
The wizard builds a map that should start and idle it, but it's a starting point. Every engine needs tuning, and running a base map hard is how parts get damaged.
Can I keep my air flow meters?
They aren't used. This ECU reads load from its onboard MAP sensor, which is simpler and handles boost changes well.