What the Elite is actually controlling
Your wastegate only knows one thing: the pressure pushing on its diaphragm. The Elite changes that pressure by pulsing a boost control solenoid in the wastegate signal line. The ECU never touches the wastegate directly, it just decides how hard to work the solenoid, and that decision is the duty cycle you see in the logs.
In ESP the whole function is spread over tabs: Wiring, Boost Control, Long Term Trim, Corrections, Trim, Scramble and the two Generic Correction tabs. Several of them only appear once you switch the matching option on, so if you can't find a tab, check the Wiring tab first. One note before you start: ESP quotes all the boost defaults in kPa, so convert carefully if you tune in psi.
Step 1: the Wiring tab
One solenoid or two?
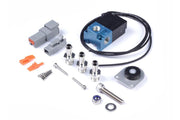
- One Solenoid: what almost every street car and bolt-on turbo kit uses. A single valve such as Haltech's 3-port 33 Hz solenoid or the 4-port solenoid does the whole job.
- Two Solenoids: meant for gas-pressure setups, usually drag cars running CO2 because it's non-flammable and gives a very steady feed. Each valve uses its Normally Closed and Common ports, and the Normally Open port has to be plugged completely. See our CO2 boost control wiring notes before you plumb it.
Choosing the output and its active state
Pick a free output for the Boost Increase Solenoid Output. A DPO (Digital Pulsed Output) is the normal choice. Active State flips the logic: on the default of Low, 0% duty leaves the solenoid shut and 100% opens it fully. High reverses that. If boost does the opposite of what you command, this setting is the first thing we check, right after the solenoid wiring itself.
Optional inputs
Three extras are switched on here, and each needs an input assigned:
- Arm switch: usually on an AVI. When the switch isn't armed, boost control is disabled and the status channel shows Not Armed.
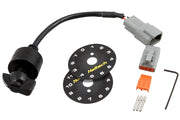
- Trim: an AVI, since a trim knob sends a varying voltage. This is what the 12-position rotary trim module plugs into.
- Scramble Boost: an SPI or AVI set up as a switch input.
Step 2: the Boost Control tab
Mode defaults to Closed Loop, where you tune a target pressure and the ECU hunts for the duty to reach it. Open Loop skips the target entirely: you map raw duty and the ECU outputs exactly that. For the controlled parameter, use Manifold Pressure unless you have a specific reason not to. Wastegate Pressure control is for CO2 two-solenoid systems and needs a wastegate pressure sensor, and the targets must be chosen with care because the controller no longer sees manifold boost. Boost Pressure needs a configured boost pressure sensor.
| Setting | ESP default | What it does | Our advice |
|---|---|---|---|
| Output Frequency | 33 Hz | Pulse rate sent to the solenoid | Set it to whatever your solenoid is rated for |
| Minimum / Maximum Duty Cycle | 0 | Clamps the duty range the controller can use | Log a few pulls to find where the solenoid starts and stops changing boost, then clamp to that window |
| Control Point Offset | 50 kPa (about 7 psi) | How far under target boost must climb before short term closed loop corrections begin | Too small overshoots, too big makes boost unsteady. Refine from logs |
| Max Derivative | 100 | Boost must be rising slower than this before corrections are allowed | Keeps the controller out of the way while the turbo is still surging |
| Overboost Offset | 15 kPa (about 2 psi) | Past target by this much, duty drops to 0% | Treat it as a safety net, not a limiter |
| Enable Spool Assist | Disabled | Holds 100% duty from positive boost up to target minus the control point offset | Faster spool, but watch for spikes on part-throttle transitions |
| Closed Loop Min TPS | 80 | Throttle must be past this before corrections run | Stops the controller from winding up duty at part throttle |
Why the min TPS guard matters: at half throttle the engine may be physically unable to hit target, so an unguarded controller keeps adding duty. Floor it and all that stored duty arrives at once as a spike. Requiring real throttle first avoids that.
The Boost Control tab also opens a set of related tables: the Closed Loop Target Pressure, the Closed Loop Base Duty Cycle (single solenoid only), a Controller Start Delay that adds a short wait once the conditions are met, the PID gain tables, and the Open Loop Base Duty Cycle used when the mode is Open Loop. For PID, think of Proportional as the reaction to the size of the error, Integral as the push that removes the error that's left over, and Derivative as a brake on overshoot. Our PID explainer goes deeper.
Step 3: build a base duty table that actually works
This is where most closed loop problems start. The base duty table is the ECU's first guess, and closed loop only trims around it. The trick is to put Boost Control Target Pressure on the horizontal axis so each target has its own column of duty.
Here's how we'd approach a car with a trim knob offering a low, a mid and a high boost setting, where the high setting also asks for a little more boost at the top of the rev range:
- Give each target value its own column on the target axis.
- Run the low setting and adjust only the low-target column until the controlled pressure lands on target. Nothing in the other columns affects the car while you do this.
- Repeat for the mid setting, touching only its column.
- For the high setting, tune its lower-rpm column below the rpm where the target steps up, then tune the higher target's column only above that rpm.
Don't swap the axis to plain Manifold Pressure: the ECU then has no way to pick a starting duty for the target it's chasing. And don't fill the whole table with one number. That can only be right for one target, so every other target will be off.
Step 4: long term trim
The Long Term Trim tab only shows up in Closed Loop with a single solenoid. When enabled, the Elite slowly learns corrections to your base duty table. It only learns under stable conditions, set by LTT Min TPS (default 90), an rpm window (defaults 2500 to 7500), and an optional minimum gear so a turbo that can't reach target in first gear doesn't teach it bad habits. The Long Term Trim Gain table sets how fast it learns: faster learning can oscillate. When you're happy with what it learned, Apply To Base Table folds the corrections into your base duty table and zeroes the trim. Reset just clears it. More on this in boost long term trim.
Step 5: corrections, trim and scramble
The Corrections tab lets you enable extra tables, and they appear in a Corrections folder under Boost Control in the ECU Navigator. There are two families:
- Duty cycle corrections for air temp, coolant temp, gear, throttle position, flex fuel composition, a generic channel and an overall value. Hot intake air typically needs a touch more duty to hold the same boost.
- Target pressure corrections for the same inputs. These are the ones we use most: pull boost when intake or coolant temps get high, run less boost in low gears for traction, soften boost at small throttle openings for a more linear pedal, and add boost when the ethanol content is high.
The two Generic Correction tabs let you gate a correction with up to three conditions built from any ECU channel, a comparison (equal, not equal, greater or less than, and so on) and a value, joined with And/Or. For more on how corrections stack, see boost corrections.
On the Trim tab, Trim Max (default -100) caps how much the knob can take away: target pressure in closed loop, or a percentage of duty in open loop. The Scramble tab gives a temporary boost bump. In closed loop, add pressure with Target Offset and leave Base Offset at 0, building the extra duty into the base table's higher-target column instead. Hold Time keeps it active after the button is released and Max Time caps the total.
Reading the Boost Control Status channel
When boost misbehaves, log this channel before changing anything. It tells you which state the controller was in:
| Status | What it means for you |
|---|---|
| Off Boost / Spooling | Below positive pressure, or on boost but not yet within the control point offset |
| Delay Time | Conditions met, controller start delay counting down |
| Closed Loop Active | The controller is correcting duty |
| Max Derivative Limit / TPS Limit | That setting is holding the controller off |
| Overboost | Overboost offset exceeded, duty cut to 0% |
| Not Armed / Scramble / Open Loop | Arm switch off, scramble active, or running open loop |
| Invalid TPS | The ECU can't read the throttle position sensor |
Troubleshooting
| Symptom | Usually |
|---|---|
| Boost does the reverse of what you command | Active State set the wrong way, or the solenoid ports are plumbed backwards |
| Great on one trim setting, off on the others | Base duty axis isn't target pressure, or one value fills the table |
| Spike on the way to target | Control point offset too small, spool assist on, or base duty too high |
| Status sits on TPS Limit | Closed Loop Min TPS higher than the throttle you're using |
| Long term trim never moves | Mode or output type doesn't allow it, or you're outside the TPS, rpm or gear window |
Protect the engine with an overboost cut as well, since the overboost offset only drops duty and can't help with a stuck wastegate or split hose.
FAQ
Should I start in open loop or closed loop on an Elite?
We often start in open loop to learn what duty the setup needs, then copy those numbers into the closed loop base duty table and switch over. Closed loop then only has small errors to correct.
Why is my Long Term Trim tab missing?
It only appears with Closed Loop selected and the output type set to One Solenoid.
Can I adjust boost from the cabin?
Yes. Enable Trim in the Wiring tab and wire a rotary trim module to an AVI, or use scramble for a timed increase. If you'd like help choosing, book a free consultation.