How a fuel level sender talks to Haltech
Whether it's a float on an arm, a tube-style sender or something more exotic, nearly every fuel level sensor works the same way electrically: it's a variable resistor. As the fuel level changes, the resistance between its terminals changes. A Haltech ECU or dash can't read ohms directly, though. It reads voltage on an analog voltage input (AVI). So the job is to turn that changing resistance into a changing voltage, then tell NSP what each voltage means.
Wiring the sender
Most senders have two terminals. You can confirm that it's working with a multimeter on the ohms scale: the reading should change as you move the float. One wire goes to an AVI, the other to sensor ground. On most senders it doesn't matter which is which, but check your vehicle wiring diagram or the sender's documentation in case one side is meant to be the signal.
Some senders have only a single terminal and ground themselves through the tank. With those, the tank's ground path matters as much as the wiring. Make sure the tank is well bonded to the chassis, and the chassis to the battery negative. A rusty strap or a tank isolated by rubber mounts gives you a gauge that wanders or does nothing at all.
Why you need a pull-up resistor, and which one
A pull-up resistor sits between the signal wire and the 5V supply from the ECU or dash. Together with the sender it forms a voltage divider: the fixed resistor is the reference, the sender's resistance changes, and the voltage at the input moves between 0 and 5V. The goal is to choose a resistor that makes that swing as wide as possible across the sender's range.
Most fuel senders span roughly 0 to 300 ohms, and for that range 240 ohms is a good choice. Here's how the choice plays out:
| Where you wire it | Built-in pull-up | What we do |
|---|---|---|
| Haltech iC-7 dash | AVI 4 has a 240 ohm pull-up you can switch on in NSP | Use AVI 4 and enable the pull-up. No extra resistor needed |
| Haltech uC-10 dash | AVI 1 has a 240 ohm pull-up you can switch on in NSP | Use AVI 1 and enable the pull-up |
| Haltech ECU | Most AVIs have a 1K ohm pull-up, designed for engine sensors | Fit an external 240 ohm resistor between the signal wire and 5V |
Why not just use the ECU's 1K pull-up? Because with a low-resistance sender, a 1K pull-up squeezes the whole fuel range into a small slice of voltage near the bottom. You'd be calibrating a full tank to an empty one across maybe a volt, and every little bit of noise shows up as a jumpy gauge. The 240 ohm resistor spreads the same range across most of the 0 to 5V window.
Here's the math on a typical 0 to 300 ohm sender with a 240 ohm pull-up: at 0 ohms the input reads 0V, and at 300 ohms it reads about 5 x 300 / (300 + 240), which is roughly 2.8V. With a 1K pull-up the same sender tops out around 1.2V. That's why the dash inputs were built with 240 ohms.
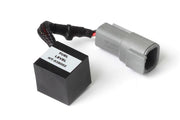
If your sender has an unusual range or you want a cleaner, buffered signal, the fuel level sender signal conditioner is worth a look. Ask us if you're not sure whether your sender needs it.
Haltech's guide includes wiring diagrams for both the dash and ECU hookups. Need this diagram? Ask us and we'll send it over with advice for your build.
Check the signal before you calibrate
With everything wired, open NSP and watch the raw voltage on the AVI you used. Move the float by hand if you can get to it, or add and use fuel if you can't. What you want to see:
- A voltage that changes smoothly as the level changes.
- A wide swing, ideally 3V or more between empty and full.
If the reading doesn't move, only moves a small amount, or sits at 0V or 5V regardless of the float, something is wrong. Recheck the wiring, the pull-up value and whether the internal pull-up is actually enabled in the software. A reading stuck at 5V usually means an open circuit (broken wire or bad ground); stuck at 0V usually means a short to ground.
Calibrating in NSP
Simple percentage calibration
- With the tank empty, note the AVI voltage.
- Fill the tank and note the voltage again.
- In the fuel level calibration table, set the empty voltage to 0% and the full voltage to 100%.
That's enough for a usable gauge and a low fuel warning.
Calibrating in gallons or liters
If you want the dash to show actual fuel left, build the table in volume instead. Start empty, add a known amount of fuel (say 2 gallons at a time), and record the voltage after each addition until the tank is full. Enter each voltage against its volume.
Don't be surprised if the result isn't a straight line. Tank shapes are rarely simple boxes, and the float moves in an arc, so equal amounts of fuel don't give equal changes in voltage. Capturing the curve is exactly why the multi-point method is more accurate than a two-point one.
Let the car sit level for a minute after each fill step before you record the voltage. Fuel sloshing on a sloped driveway throws off the numbers, especially on shallow, wide tanks.
Troubleshooting
| Symptom | Usually |
|---|---|
| Gauge stuck at full or empty no matter the fuel level | Open circuit on the signal or ground, or a single-wire sender with a poor tank ground |
| Gauge barely moves between full and empty | Using a 1K ECU pull-up with a low-ohm sender; fit a 240 ohm resistor |
| Gauge jumps around while driving | Fuel slosh, a narrow voltage range, or a marginal ground |
| Reads backwards | Sender goes high ohms at empty rather than full; just swap the calibration points |
FAQ
Can I use my factory fuel sender with a Haltech dash?
Usually, yes. Measure its resistance at empty and full first. If it falls in the common 0 to 300 ohm range, the dash's built-in 240 ohm pull-up will suit it.
Should I wire the sender to the ECU or the dash?
If you have an iC-7 or uC-10, the dash is the easier choice because of the switchable pull-up. For the software side, see our articles on the Nexus fuel level sensor and Elite fuel level sensor settings.